آموزش لینوکس وآنتی ویروس
آموزش لینوکس وآنتی ویروسآموزش لینوکس وآنتی ویروس
آموزش لینوکس وآنتی ویروس
Install MySQL to configure Database Server
  +--------------------+ Configuring mysql-server-5.5 +---------------------+
  | While not mandatory, it is highly recommended that you set a password   |
  | for the MySQL administrative "root" user.                               |
  |                                                                         |
  | If this field is left blank, the password will not be changed.          |
  |                                                                         |
  | New password for the MySQL "root" user:                                 |
  |                                                                         |
  | ************************************___________________________________ |
  |                                                                         |
  |                                 <Ok>                                    |
  |                                                                         |
  +-------------------------------------------------------------------------+
root@www:~# mysql -u root -p
Enter password:
Welcome to the MySQL monitor.  Commands end with ; or \g.
Your MySQL connection id is 42
Server version: 5.5.30-1.1 (Debian)

Copyright (c) 2000, 2013, Oracle and/or its affiliates. All rights reserved.

Oracle is a registered trademark of Oracle Corporation and/or its
affiliates. Other names may be trademarks of their respective
owners.

Type 'help;' or '\h' for help. Type '\c' to clear the current input statement.
mysql> select user,host,password from mysql.user;
+------------------+-----------+-------------------------------------------+
| user             | host      | password                                  |
+------------------+-----------+-------------------------------------------+
| root             | localhost | *D1EEXXXXXXXXXXXXXXXXXXXXXXXXXXXXXXXXXXXX |
| root             | www       | *D1EEXXXXXXXXXXXXXXXXXXXXXXXXXXXXXXXXXXXX |
| root             | 127.0.0.1 | *D1EEXXXXXXXXXXXXXXXXXXXXXXXXXXXXXXXXXXXX |
| root             | ::1       | *D1EEXXXXXXXXXXXXXXXXXXXXXXXXXXXXXXXXXXXX |
|                  | localhost |                                           |
|                  | www       |                                           |
| debian-sys-maint | localhost | *D1EEXXXXXXXXXXXXXXXXXXXXXXXXXXXXXXXXXXXX |
+------------------+-----------+-------------------------------------------+
7 rows in set (0.00 sec)
mysql> delete from mysql.user where user='';
Query OK, 2 rows affected (0.00 sec)
Bye

قسمت دوم Install VNC viewer on client computer next

http://www.realvnc.com/products/free/4.1/download.html
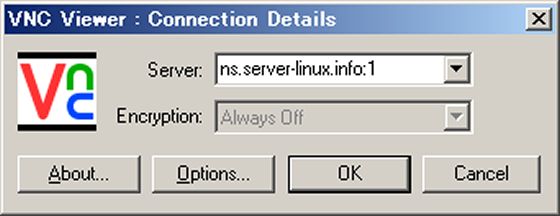
Start VNC viewer after installing. Then following scrren is shown. Input [(Server's hostname or IP address):(display number)] like following example.


قسمت اول Install VNC Server to operate Fedora with GUI remotely from Windows client
(توجه: خطوط سبز رنگ بیانگر توضیحات می باشد و خطوط صورتی رنگ دستور های اجرایی می باشد.)
Install VNC Server to operate Fedora with GUI remotely from Windows client:
[root@ns ~]#yum -y install vnc-server
[root@ns ~]#vi /etc/sysconfig/vncservers
VNCSERVERS="1:fedora"
# And set any screen resolution you like
VNCSERVERARGS[1]="-geometry 1024x768 -nolisten tcp -nohttpd"
[root@ns ~]#su - fedora
[fedora@ns ~]$ vncpasswd
Password:
Verify:
[fedora@ns ~]$ su -
Password:
[root@ns ~]# /etc/rc.d/init.d/vncserver start
Starting VNC server: 1:fedora
New 'ns.server-linux.info:1 (fedora)' desktop is ns.server-linux.info:1
Creating default startup script /home/fedora/.vnc/xstartup
Starting applications specified in /home/fedora/.vnc/xstartup
Log file is /home/fedora/.vnc/ns.server-linux.info:1.log
[root@ns ~]# vi /home/fedora/.vnc/xstartup
[root@ns ~]# /etc/rc.d/init.d/vncserver restart
Shutting down VNC server: 1:fedora
Starting VNC server: 1:fedora
New 'ns.server-linux.info:1 (fedora)' desktop is ns.server-linux.info:1
Starting applications specified in /home/fedora/.vnc/xstartup
Log file is /home/fedora/.vnc/ns.server-linux.info:1.log
آموزش لینوکس : قسمت دهم- ایجاد User & Password
root@ns ~]#passwd fedora
Changing password for user fedora.
New UNIX password: # input password you want to set
passwd: all authentication tokens updated successfully.
root@ns ~]#exit

How to reset your password in Ubuntu
First, you have to reboot into recovery mode.
If you have a single-boot (Ubuntu is the only operating system on your computer), to get the boot menu to show, you have to hold down the Shift key during bootup.
If you have a dual-boot (Ubuntu is installed next to Windows, another Linux operating system, or Mac OS X; and you choose at boot time which operating system to boot into), the boot menu should appear without the need to hold down the Shift key.
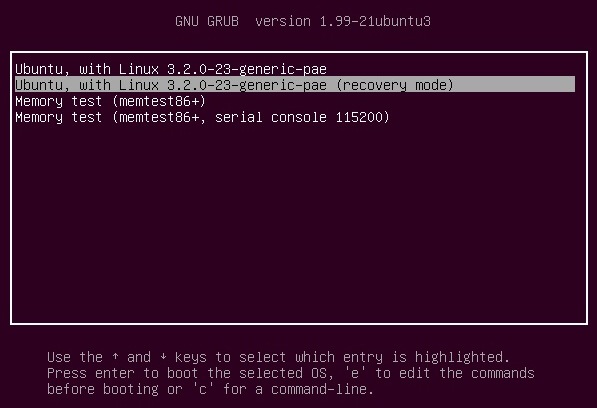
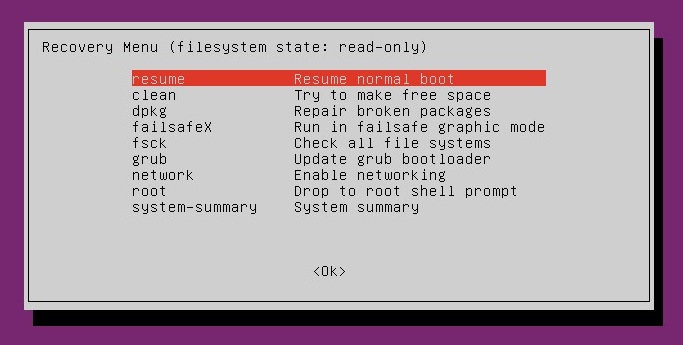
From the boot menu, select recovery mode, which is usually the second boot option.
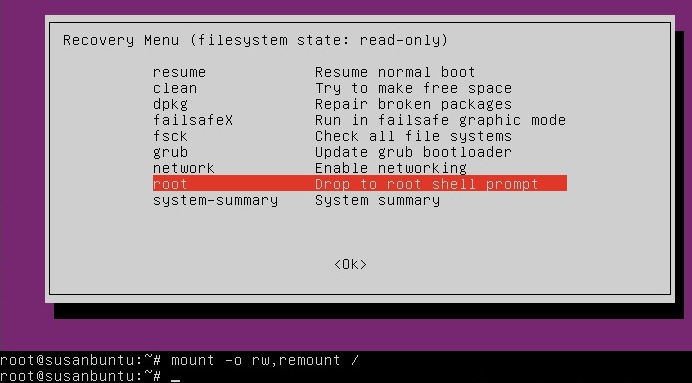
After you select recovery mode and wait for all the boot-up processes to finish, you'll be presented with a few options. In this case, you want the Drop to root shell prompt option so press the Down arrow to get to that option, and then press Enter to select it.
The root account is the ultimate administrator and can do anything to the Ubuntu installation (including erase it), so please be careful with what commands you enter in the root terminal.
In recent versions of Ubuntu, the filesystem is mounted as read-only, so you need to enter the follow command to get it to remount as read-write, which will allow you to make changes:
mount -o rw,remount /
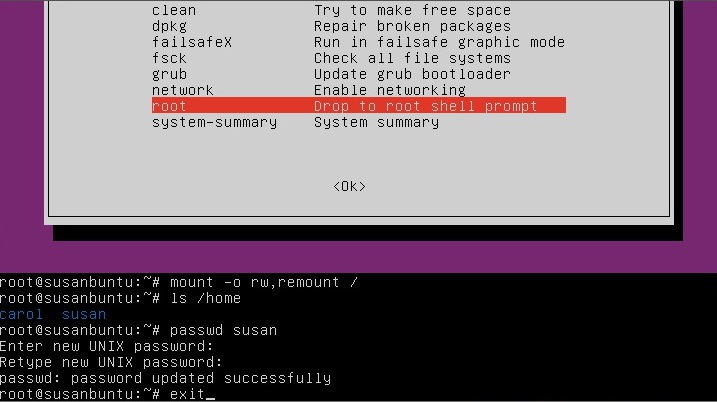
If you have forgotten your username as well, type
ls /home
That's a lowercase L, by the
way, not a capital i, in ls. You should then see a list
of the users on your Ubuntu installation. In this case, I'm going to
reset Susan Brownmiller's password.
To reset the password, type
You'll then be prompted for a new password. When you type the password you will get no visual response acknowledging your typing. Your password is still being accepted. Just type the password and hit Enter when you're done. You'll be prompted to retype the password. Do so and hit Enter again.
Now the password should be reset. Type
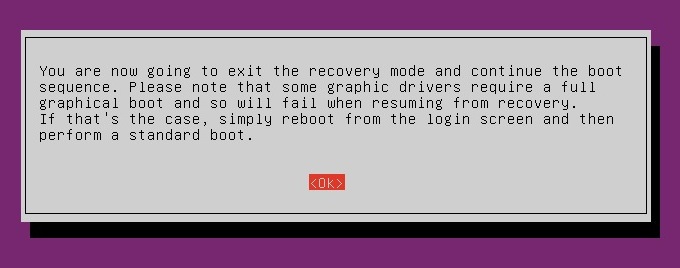
After you get back to the recovery menu, select resume normal boot, and use Ubuntu as you normally would—only this time, you actually know the password!
Note:
Some people get freaked out about having recovery mode logging you in
as root. For more information, read Recovery mode makes me root user. Isn't
that a security risk?